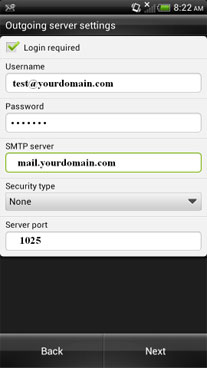
Your outgoing settings will be essentially the same as your incoming settings. Make sure you click "login required" on the top "security type" can stay as "none" and port should be changed to 1025.
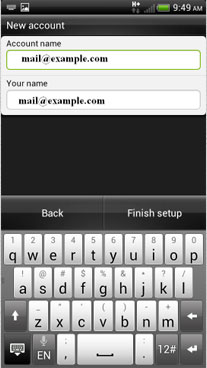
The account name field will be what the account is called on your phone. The your name field is what people will see on your messages when you send them. Click "finish setup" and your done.
Keep in mind that andoid has more mail programs than we care to count. If the customer is looking for a good example or is having difficulties with the default mail program we've noticed K9 mail seems to have fewer problems. These steps can be followed, generally, to set up all of them
If you get stuck remember the options button, not shown on most screenshots, will get you started.
and if all else fails get the customer to read what's on the screen and you can give them the settings
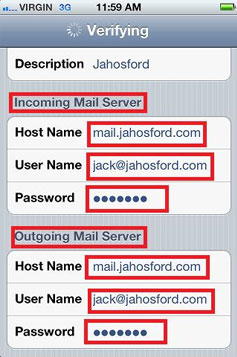
Scroll down and input the settings for your Incoming Mail Server. Enter "mail.yourdomain.com" in the "Host Name" field. Enter your full email address in the "User Name" field and your password in the "Password" field. Scroll down and input the settings for the Outgoing Mail Server (SMTP). Enter "mail.yourdomain.com" in the "Host Name" field and replacing "yourdomain.com" with your own domain name. Enter your full email address in the "User Name" field and your password in the "Password" field. Press the "Next" button in the top right hand side of the screen. It will be "Verifying" it can take up to 5 or 10 minutes.
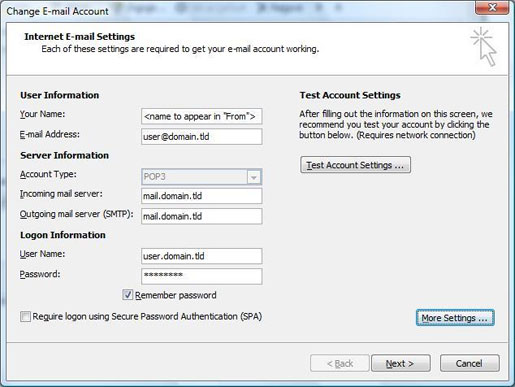
Make sure that your settings look like the settings shown in this screenshot.
The following are the most important:
Your Name Your Name (eg. John Smith)
E-mail Address: [email protected] (eg. [email protected])
Incoming mail server (POP3): mail.domain.tld (eg. mail.test.com)
Outgoing mail server (SMTP): mail.domain.tld (eg. mail.test.com)
User Name: email.domain.tld (eg. john.test.com NOT [email protected])
Password' The one you specified in your EasyMail Setup (8 characters maximum).
Once your settings look like the settings shown in this screenshot, click on the 'More Settings...' button in the bottom right hand corner.
CANNOT SEND EMAIL?
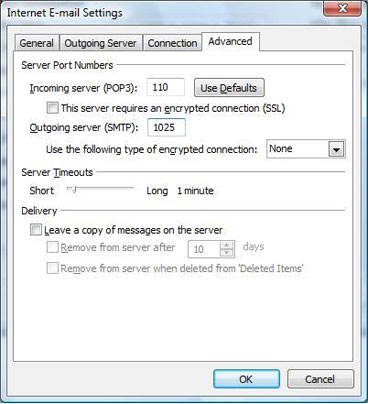
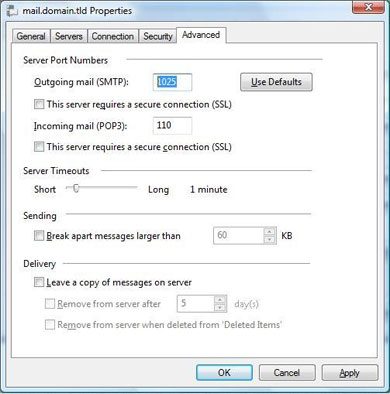
If you can receive email however you cannot send email and the settings are exactly as shown above, change your outgoing mail (SMTP) port from the default of 25 to 1025.
To do this:
Click on 'Tools' > 'Account Settings...'> Select the account and click the 'Change' button> 'More Settings...' button in the bottom right > 'Advanced' tab.
Change the 'Server Port Numbers' - 'Outgoing server (SMTP)' from 25 to 1025.
Background Reasoning:
In order to combat spam, some Internet Service Providers (ISPs) block traffic to external servers on port 25 so that customers using that ISP can only use the ISP's mail server. If that customer is going to spam, the idea is that they must use the ISP's mail server to spam and therefore be caught very quickly, and handled accordingly. Realizing that many ISP's mail servers have a more restrictive options (ie. not being able to send to more than 100 people at a time) as they are usually residential mail servers, we have opened an alternative port to allow you to send mail using our mail servers, one that the ISPs do not block. That port is SMTP port 1025.
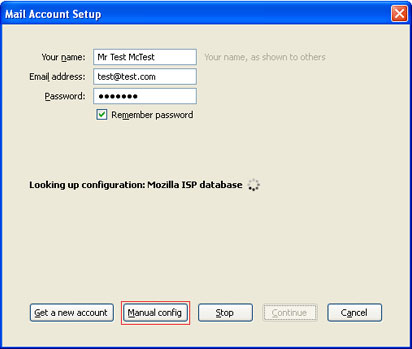
It will begin to scan common servers at this point. You can cancel this process by clicking "Manual Config"
So do that now.
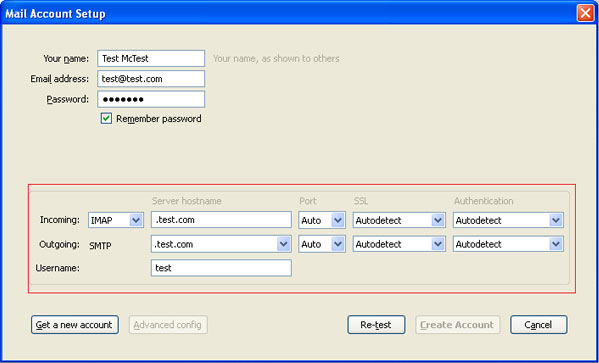
This is the screen we really want to see.
On here we would enter our:
'Incoming Server':
Replace with: mail.your_website_address.com
And our:'Outgoing Server':
Replace with: mail.your_website_address.com
Set the incoming port to 143 for IMAP or 110 for POP for incoming and the outgoing port to 1025. Set the SSL's to "None" and the authentication to "normal password" and, of course, set your username to your email address.
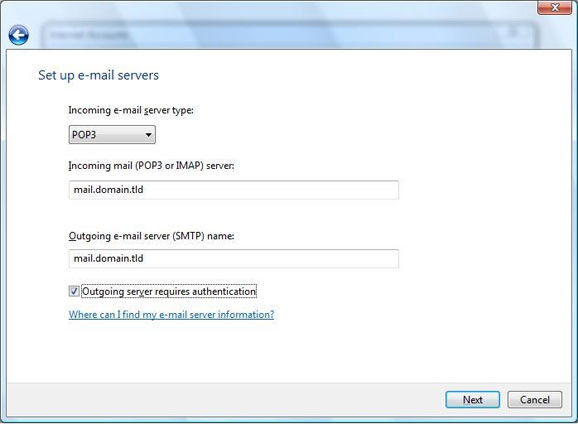
E-mail Server Names
Make sure you have 'POP3' selected for the incoming mail server type.
Incoming mail (POP3, IMAP, or HTTP) server':
mail.domain.tld (eg. mail.test.com)
'Outgoing mail (SMTP) server':
mail.domain.tld (eg. mail.test.com)
Check box for 'My outgoing server requires authentication'
Click 'Next.'
If you are not there already, please go to the 'Tools' menu, click 'Accounts...' You should see your new account listed here. Select it and click b
> Tools > Accounts > Properties

CANNOT SEND EMAIL?
If you can receive email however you cannot send email and the settings are exactly as shown above, change your outgoing mail (SMTP) port from the default of 25 to 1025.
To do this:
Click on the 'Edit' menu > 'Preferences...' > 'Mail Servers' sub-category on the left.
Change the 'Outgoing mail (SMTP) server' from 'Replace with: mail.your_website_address.com' to 'Replace with: mail.your_website_address.com:1025'.
Background Reasoning:
In order to combat spam, some Internet Service Providers (ISPs) block traffic to external servers on port 25 so that customers using that ISP can only use the ISP's mail server. If that customer is going to spam, the idea is that they must use the ISP's mail server to spam and therefore be caught very quickly, and handled accordingly. Realizing that many ISP's mail servers have a more restrictive options (ie. not being able to send to more than 100 people at a time) as they are usually residential mail servers, we have opened an alternative port to allow you to send mail using our mail servers, one that the ISPs do not block. That port is SMTP port 1025.
Open Macintosh Mail.
If this is the first time you have started Mail, you will be promoted to enter in your email settings. If you have already been inside Mail, click on the 'Mail' menu > 'Preferences...' > 'Accounts' category > in the bottom left corner, click the '+' sign.
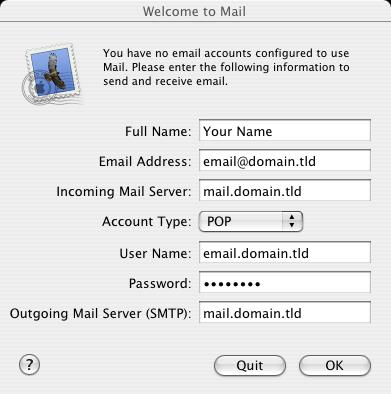
Make sure that your settings look like the settings shown in this screenshot.The following are the most important:
'Full Name': Replace with: Your Name
'Email Address': Replace with: your_email@your_website_address.com
'Incoming Mail Server': Replace with: mail.your_website_address.com
'Account Type': POP
'User Name': Replace with: your_email.your_website_address.com
'Password': The one you specified in your EasyMail Setup (8 characters maximum)
'Outgoing Mail Server (SMTP)': Replace with: mail.your_website_address.com
Click 'OK'
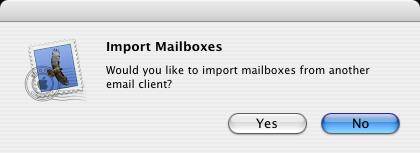
This will bring up the Import Mailboxes dialog box asking you if you wish to import mail from another email client. Click 'No' and it will open up the application fully and show you your 'Inbox', automatically doing a Send/Receive for email.
You should be able to send and receive email.
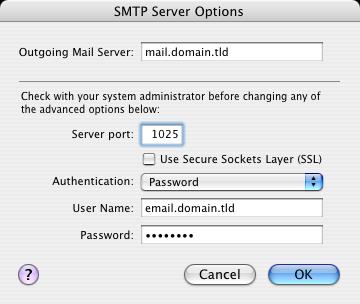
If you can receive email however you cannot send email and the settings are exactly as shown above, change your outgoing mail (SMTP) port from the default of 25 to 1025.
To do this: Click on the 'Mail' menu > 'Preferences...' > 'Accounts' category > Highlight the account on the left list > 'Server Settings...' button below 'Outgoing Mail Server (SMTP)' at the bottom of the screen.
Change the 'Server port' from 25 to 1025.
Background Reasoning: In order to combat spam, some Internet Service Providers (ISPs) block traffic to external servers on port 25 so that customers using that ISP can only use the ISP's mail server. If that customer is going to spam, the idea is that they must use the ISP's mail server to spam and therefore be caught very quickly, and handled accordingly. Realizing that many ISP's mail servers have a more restrictive options (ie. not being able to send to more than 100 people at a time) as they are usually residential mail servers, we have opened an alternative port to allow you to send mail using our mail servers, one that the ISPs do not block. That port is SMTP port 1025.

 Android
 Blackberry
 Ipad
Ipad Outlook
 Thunderbird
 Windows Mail
 Mac Mail


